Continuous integration is a process in which all development work is integrated at a predefined time or event and the resulting work is automatically tested and built. Jenkins is one open source tool to perform continuous integration.
–> Step by step process to install and configure Jenkins with your scripts
-
Install “Jenkins.war” http://mirrors.jenkins-ci.org/war/latest/ file in your system
-
Keep .war file where you have your workspace for example C:\Users\xyz\workspace so keep your “jenkins.war” at C:\Users\xyz\jenkins.war
-
Then open command prompt (cmd) and type “Java –jar jenkins.war “ and run it (Make sure JDK is already install in your computer).
-
Make sure “.Jenkins” folder is created after running this command.
-
Open your browser and give localhost url :-> localhost:8080
-
Now go to Manage Jenkins-> configure system -> set JDK ,ANT/ Maven values as set below.
JDK :: Uncheck “install automatically” to get Java_Home field.
Jdk name
Java_home
![C:\Users\Lenova-3831\Desktop\Blog\Jenkins_Integartion\FireShot Screen Capture #017 - 'Configure System [Jenkins]' - localhost_8080_configure.png](https://lh4.googleusercontent.com/KRfEaa-CzIvde63M03Z0l4WFkzKomyUTjS6OTysa8Te8h5LXfTXEuiqYLEm-vZObN4KJzPQKN3iCe5orFGDFCkDIYivU3R2mTLWH_aFRZydMPSzKGFVChmwr9bgiZTZhh8RsYtY)
-
If you are using ANT(Another Neet Tool) then set ANT name as “ Apache Ant “ . Shown below
-
If you are using Maven Uncheck “install automatically” to get Maven_Home field.
![C:\Users\Lenova-3831\Desktop\Blog\Jenkins_Integartion\FireShot Screen Capture #018 - 'Configure System [Jenkins]' - localhost_8080_configure.png](https://lh3.googleusercontent.com/KcLGA0qXEuNEPdm81wkgAlQ0pIHku8UDSgB8PbFqNZqP9Yyof4qWiOe4GalPINWY9X3YJH0ElwDOFLAUCUoILGQdgra_Ppx4raTEH2xs1UWbShJVS2-ILqP9JjoWMEk6J6qUpJs)
![C:\Users\Lenova-3831\Desktop\Blog\Jenkins_Integartion\FireShot Screen Capture #019 - 'Configure System [Jenkins]' - localhost_8080_configure.png](https://lh6.googleusercontent.com/GEdLROkRhvprvCwWzka8mXJrBx3W-UPvVWFsjMB8iXnYv3OOvI31H_la1sAtXdsArxneK3vqZt4X-1dNKFHxzyOkECTLVkTEOidxiHxQPGhkKvbkZJavr-mzy1Gy05lQu9Do47A)
Type Maven_Home path here.
Now click on “save ” button
-
After configuring Jenkins , Create a new job
-
Give your project name and If you are building a maven project then choose “Build a maven 2/3 Project” or if you are building a Ant project then choose “Build a free-style software project”
-
Go to “Build” under your created job -> add build step choose “Invoke ant” (If your project Is build using Ant) or choose “Invoke top-level Maven targets” (If your project is build using Maven)

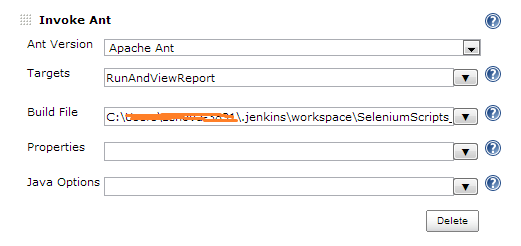
If it is Ant then you have to set the field
Ant version :: Apache Ant
Target :: RunAndViewReport
BuildPath :: your script path
-
Click on save button
-
Now run your first build by clicking on “Build now” You will see that it will get fail first time Don’t worry , it is a part of your process.
-
Now go to your workspace -> open the folder “.Jenkins” . -> Copy your all scripts into .jenkins/workspace/”Name of your job” and refresh the Jenkins.
-
Go to your job -> workspace -> Make sure your projects file all there in workspace now
-
Now run the build again. (If you are running your scripts in chrome browser then give proper path of your chrome driver)
And you are done with Selenium Integration with Jenkins
–>Additional
How to schedule
job configuration-> “Build Triggers”, ->”build periodically” field
This field follows the syntax of cron (with minor differences). Specifically, each line consists of 5 fields separated by TAB or whitespace: MINUTE HOUR DOM MONTH DOW
I just tried to get a job to launch at 4:42PM (my approximate local time) and it worked with the following, though it took about 30 extra seconds:
42 16 * * *
42 16 * * *
If you want multiple times, I think the following should work:
0 16,18,20,22 * * *
for 4, 6, 8, and 10 o’clock PM every day.
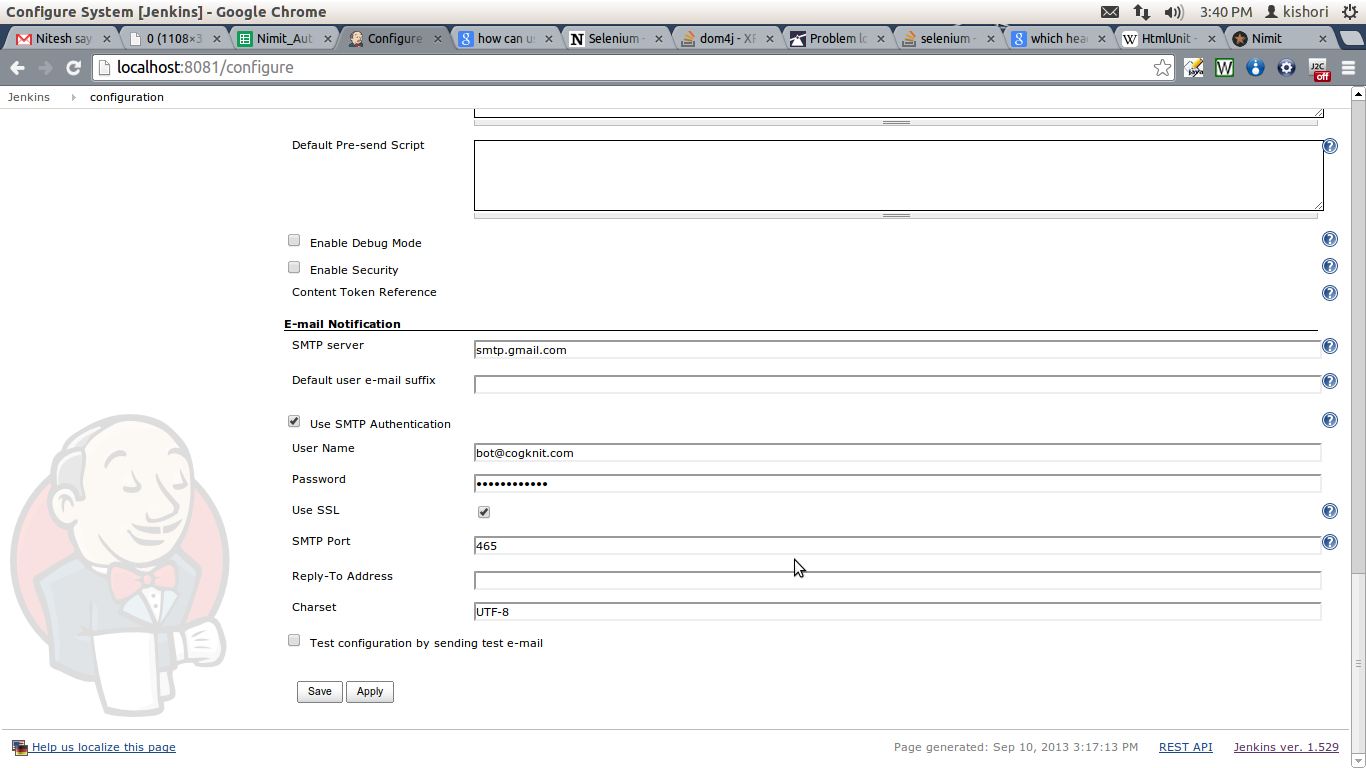
How to send email automatically after completing a job
Set Configuration as shown below:
Now you are done with integration of your selenium scripts with Jenkins.
